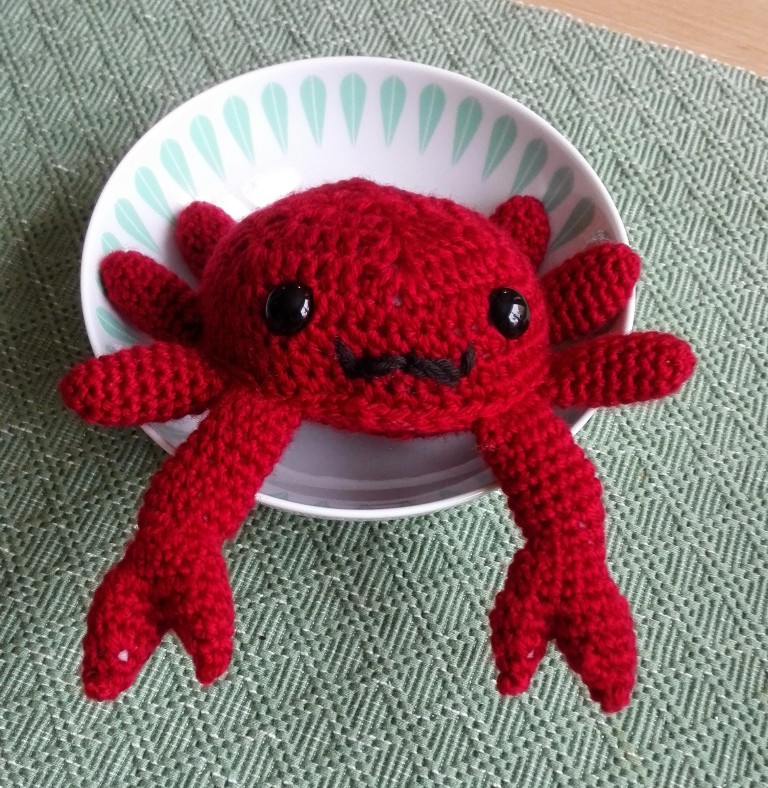
Mr. Crab
Here is how you make yourself a dandy little Mr. Crab:
What you’ll need:
I used a yarn that is 100% acrylic, but I believe cotton works too,
and fits a crochet hook in size 3,5mm/4mm(E/G). 50 grams.
But use the 3,5mm/E because it’s wise to use the smaller hook
when making a stuffed animal.
Stuffing
Safety eyes, or thread to sew eyes with.
Scissors, needles, and crochet hook.
Abbreviations:
Ch = chain
St = stitch
Sl = slip stitch
Sc = single crochet
Dc = double crochet
Hdc = half double crochet
Dec = decrease
The Body:
First you need to make 2 Hexagon motifs that you sew together later to make the body.

I used a tutorial from this site: https://www.craftsy.com/blog/2015/11/crochet-hexagon/ where I used the Solid Crochet Hexagon. So this is not mine, but it is a pretty common pattern, and its available for free on that site.
I followed this pattern, but I also added an extra round, that will be round 4. Which will be like this:

4: Ch 4. 2 dc in the first stitch. *skip 1 dc, then you make 1 dc each in the next 5 st. Skip 1 dc. Then you make the point as normal with 2 dc in the chain space, ch 1, and 2 dc in the same space. * repeat from the * out the round and sl into the 3. ch from the beginning 4 ch. = 54 st. (Do not fasten off yet.)
After this you continue the two motifs a bit different. For the one that will work as the top of the crab you will add 4 rounds of 1hdc in every stitch.
For the one that will work as the bottom of the crab you will only add 1 round of 1hdc in every stitch.
Now you can fasten off the motifs, but make sure that the top of the crab motif has a long tail you can use to sew the two together later.

Legs – make 6 one of them.
For here on out you crochet in spiral. This means that you do not sl stitch the round together, but you just continue. I found this to be okay since there are so few stitches anyways, so I just counted along the way. You could also place a marker at the beginning of the round if you prefer.
1: Make a magic ring and add 4 sc and sl them together, or you can ch 4 and sl them together = 4 st.
2: 2 sc in each st x 4 times = 8 st.
3: 2 sc in the first st, then 1 sc in the next 3 st x 2 times = 10 st.
4-10: 1 sc in every st = 10 st.
Cut and fasten the thread, and make sure it is long enough to sew on the legs to the body later.
Arms – make 2
Here you are going to make a right- and a left-arm, but the beginning is the same on both arms:
1: Chain 10 and sl together = 10 st (try to make sure to have a long thread at the beginning you can use to sew the arm on the body with later)
2-6: 1 sc in every st = 10 st.
7: 2 sc in the first st, 1 sc in the next 4 st x 2 times = 12 st.
8-10: 1 sc in every st = 12 st
11: Dec x 4 times, then 2 sc in every st in the next 4 st = 12 st.
12: Dec x 2 times, then 1 sc in the next 3 st, then 2 sc each in the next 2 st, then 1 sc each in the next 3 sc = 12 st.
13-14: 1 sc in each st = 12 st.
15: 2 sc in every st = 22 st.
1) Then you will first make one arm where you start with the biggest claw, before you make the little one after:
Big claw – continue from where you left off on the base:
1: 1 sc each in the next 6 sc, skip 10 st, 1 sc each in the next 6 st = 12 st.
2: 1 sc each in every st = 12 st.
3: Dec x 6 times = 6 st.
4: 1 sc each in every st. = 6 st.
5: Dec x 3 times = 3 st.
Fasten off and sew together whatever is left of a hole in the top.
Small claw – start with a new thread in the first st of the remaining 10 st of the base:
1: 1 sc each in the 10 st and sl to bind them together = 10 st. (here it is also wise to fasten the thread inside of the arm, because you won’t be able to do that later).
2: Dec x 5 times = 5 st.
3: 1 sc each in every st = 5 st.
4: Dec x 2 times = 3 st.
Fasten off and sew together whatever is left of an hole in the top.


So to get a mirrored hand that will work on the other side, you’ll pretty much do the opposite. Start with the small claw this time by continuing on the base:
Small claw – continue at the base:
1: 1 sc each in the next 5 st, skip 12 st, and 1 sc in the next 5 st = 10 st.
2: Dec x 5 times = 5 st.
3: 1 sc each in every st = 5 st.
4: Dec x 2 = 3 st.
Fasten off and sew together whatever is left of a hole in the top.
Big claw – start with a new thread in the first st of the remaining 12 st on the base:
1: 1 sc each in every st and sl into the first st to bind them together = 12 st (here it is also wise to fasten the thread because you won’t be able to do this later).
2: 1 sc each in every st = 12 st.
3: Dec x 6 times = 6 st.
4: 1 sc each in every st = 6 st.
5: Dec x 3 times = 3 st.
Fasten off and sew together whatever is remaining of the hole in the top.
Now you should have to mirrored claws. When you sew these on the body the small claws should face each other on the inside, and the big claws should face outwards.
How to put the pieces together:
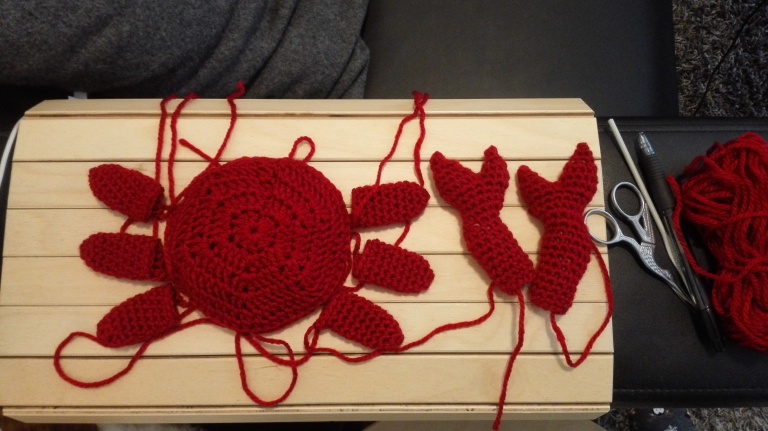
Put the Hexagon motif that functions as the underside flat down on the table, with the wrong side facing up. (This is the one with only 1 round of hdc around it). Lay the legs and arms around like you feel is natural. This is how I did it:

Stuff the legs and arms not quite full, but leave a little space left at the top. Sew together the holes and fasten them flat down onto the Hexagon motif. Fasten all the threads.
The you will take the top Hexagon and lay it on top so the points match up. I started sewing them together on the backside, and working my way around. You want to sew them together so that the piece coves the raw edges of the legs. Sew though both the Hexagon pieces and the legs when you sew them together.

When you reach about the arms you want to fasten the safety eyes. If you are sewing eyes on with thread you can choose to do this later if you want.
When you come about to the last to legs you want to take a break and start filling up the body with stuffing. Make sure to stuff it pretty well. Then you can sew the opening shut and fasten the thread.
I sewed on a moustache on my crab, to make it a dandy Mr. Crab, but you can also just sew on a mouth. (If you want a Mrs. Crab you can sew on a lady mouth?)

Tadaaa, you have a little Mr. Crab!
You may sell items made with this pattern (private sale, not coorporate), but do reference me if you put it up for sale in etsy or instagram and so on.
You can not republish the text and photos on your own blog etc, without referencing me, or asking me first. But you may share it as much as you like, as long as you link back here to me or my instagram.
If you make this crab I would love to see your creations! If you post on Instagram please tag it with #katrineklarer, or tag me @katrineklarer in it 😀

And please let me know if anything is wrong with the pattern. Thanks!

Du er så utrolig flink: D< 3
LikerLiker
Takk Kittil 🙂
LikerLiker