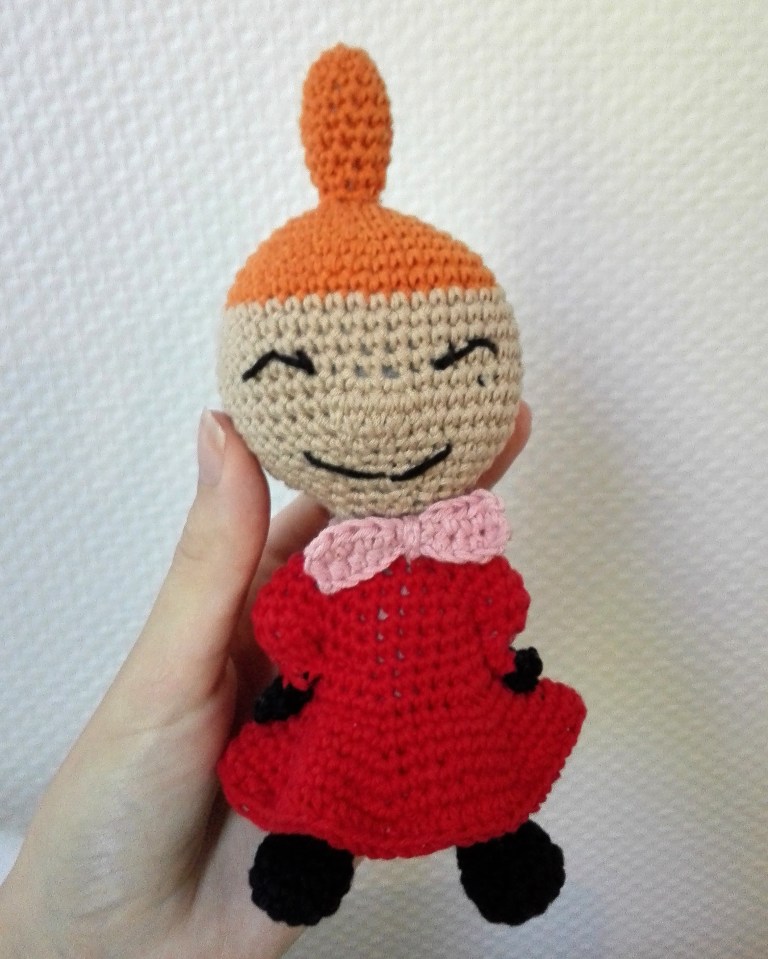
Pattern for a little Little My amigurumi, about 20cm/8 inches tall.
What you’ll need:
Yarn: Drops Safran in the colors: Red, Light Pink, Orange, Black, Beige.
Needle: 2 mm/B/1
If you want your Little My bigger you can use thicker yarn and change the needle. Make sure the needle is a little smaller than suggested on the yarn.
Needle. Scissors. Stuffing. Stitch markers.
Abbreviations: US terminology.
Magic circle. Sc – single crochet. Hdc – half double crochet. Sl st – slip stitch. St – stitch.
Ch – chain. Inc – increase, 2 sc in the same stitch. Dec – decrease, 2 stitches together, use invisible decrease if you can.
1 sc, inc x 6 – this means to make 1 sc, inc in the next stitch and repeat this for 6 times total.
This pattern is worked in the round, unless otherwise is stated.
Little My is crocheted in almost one piece. You start at the top and make the hair, head and body in one piece. You sections off for the arms, and crochet them in later and you crochet the legs and sew them on. Also you crochet a bow and sew this on.
Read through the pattern before you begin.

Hairbun: in orange
1: magic circle with 6 sc
2: 1 sc, inc x 3 = 9
3: 1 sc in every st = 9
4: 2 sc, inc x 3 = 12
5-9: 1 sc in every st = 12
10: 2 sc, dec x 3 = 9 Fill with stuffing.
11: 1 sc, dec x 3 = 6

Head: continue with orange
12: inc x 6 = 12
13: 1 sc, inc x 6 = 18
14: 2 sc, inc x 6 = 24
15: 3 sc, inc x 6 = 30
16: 4 sc, inc x 6 = 36
17: 5 sc, inc x 6 = 42
18-19: 1 sc in every st = 42
Switch color to beige – remember to fasten threads. Tip on how to switch color

20-23: 1 sc in every st = 42
24: 1 sc in the first 20 sts, inc in the next 2 sts, and 1 sc in the next 20 sts. This you do to make a little nose. It might be wise to have a little stitch marker between these stitches, so that you always know where the nose is.= 44
25: 1 sc in the first 20 sts, inc in the next 4 sts (nosestitches), and 1 sc in the next 20 sts = 48
26: 1 sc in the first 20 sts, dec x 4(over the nosestitches), 1 sc in the next 20 sts = 44
27: 1 sc in the first 20 sts, dec x 2(over the nosestitches), 1 sc in the next 20 sts = 42
28: 5 sc, dec x 6 = 36
29: 4 sc, dec x 6 = 30
30: 3 sc, dec x 6 = 24
31: 2 sc, dec x 6 = 18
Now you can embroider on the face with some of the black yarn, and fill the head. Place some extra filling under the nose. You can of course sew on a different look that what I have, I just did what I felt like, and managed to do. Google/search Pinterest for Little My to see her expressions 🙂
32: 1 sc, dec x 6 = 12
33-34: 1 sc in every st = 12
Switch to red yarn. Remember to fasten the threads.

Body:
35: 1 sc, inc x 6 = 18
36: 2 sc, inc x 6 = 24
37: 3 sc, inc x 6 = 30
38: 4 sc, inc x 6 = 36
39: 5 sc, inc x 6 = 42
Now you’re going to divide sections into arms and body. Your round should end about at the middle of the head from the side, which means it’s about at the middle of an arm. I got my inspiration for this technique here. Check out that site. There are alot of pictures, and can make it alot clearer.


40: 1 sl st in the next 4 sts, 1 sc in the next 11 sts, skip 9 sts and insert your needle in to the 10. st and make 1 sc. This forms a hole for an arm. 1 sc in the next 11 sts, skip 9 sts and insert the needle into the 10. st and make 1 sc. This forms the hole for the second arm, and leaces 24 sts for the body. (the first 11 scs + the other 11 scs)
Fill the neck well with stuffing before moving on.
41: 3 sc, inc x 6 = 30 (over those 24 sc, the biggest hole).
42: 4 sc, inc x 6 = 36
43: now you’re going to crochet only in the back loop, 1 sc in every st = 36. This will create some loops where you can make your skirt later.
44: 4 sc, dec x 6 = 30
45: 3 sc, dec x 6 = 24
46: 2 sc, dec x 6 = 18
47: 1 sc, dec x 6 = 12 Fill with stuffing.
48: dec x 6 = 6
Finish off and sew the remaining hole shut.

Skirt:
1: Start at the back of the body, into one of the loops with a new thread (red). Make 1 sc in every loop around = 36
2: 5 sc, inc x 6 = 42
3: 6 sc, inc x 6 = 48
4: 7 sc, inc x 6 = 54
5: 8 sc, inc x 6 = 60
6: 1 hdc in every st = 60
Finish off and fasten threads.
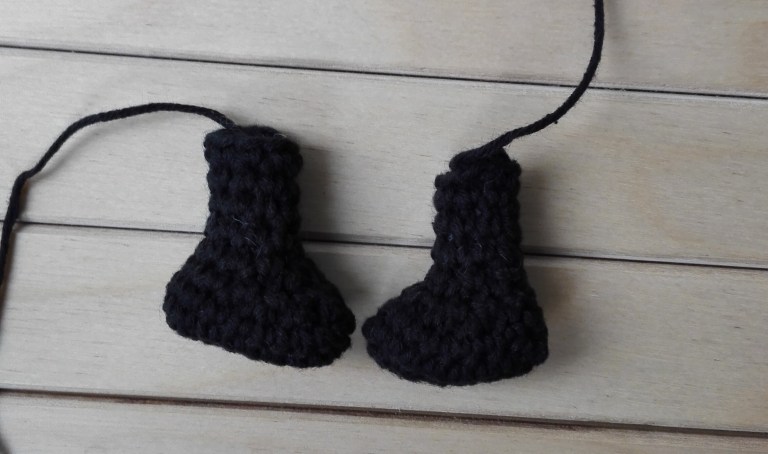
Legs – make 2:
1: chain 9 in black yarn
2: 1 sc in the 2. chain from the hook and 1 sc in the next 6 sts, 2 sc in the last st. Continue on the other side of the piece with 7 sc = 16
3: inc x 2, 1 sc in the next 12 sts, inc x 2 = 20
4: 1 sc in every st = 20
5: dec x 4, 1 sc in the next 4 sts, dec x 4 = 12
6: dec x 2, 1 sc in the next 4 sts, dec x 2 = 8 – fill with stuffing
7-10: 1 sc in every st = 8
Finish off and make sure to have a long tail to sew on the leg with. Fill the rest of the leg with a little stuffing, not too much.

I know that these legs don’t look too much alike Little Mys thin boots. But I did try several times to make these boots, and I just had to give up. It’s so small and black, so its really hard to make a good shape, and to see the stitches. So I figured, if I struggle so much, I can’t expect others to do it too. So I made a simpler version. But I still like them.


Arms:
First arm (right arm for you, left for Little My)
Start with new thread (red) in «the armpit» and fasten the threadend before you go on.
1: make 1 sc in all of the 8 sts around the hole, these and the one you started with = 9
2: 1 sc, dec x 3 = 6
3-4: 1 sc in every st = 6 – fill the arm with stuffing
5: Change to black, remember to fasten threads. 1 sc in every st, but in the back loop only. This creates and edging which looks like an arm sleeve.
6: Chain 2, sl st into the next st, chain 4 , sl st into the next st, chain 4 , sl st into the next st. This creates «fingers». 1 sl st in the next 3 sts.
Finish off and sew shut the remaining hole.
Second arm (left for you, right for Little My):
Do round 1-5 as the first arm.
6: 1 sl st in the 3 first sts, chain 4, sl st into the next st, chain 4, sl st into the next st, chain 2, sl st into the next st.
Finish off and sew shut the remaining hole.
You can either keep the arms like this, or sew them a little onto the body, so you get that typical Little My pose.

Bow:
1: chain 12
2: 1 hdc in the 2. chain from the hook, 1 hdc in the next 3 sts, 1 sc in the next, 1 sl st in the next, 1 sc in the next, 1 hdc in the last 4 sts = 11
3: chain 1, turn, make 4 hdc, 1 sc, 1 sl st, 1 sc, 1 sl st, 4 hdc over the stitches = 11
Finish off and fasten the threads.
Band:
Chain 5, and wrap it around the middle of the bow, and fasten it together with a sl st to the first st.
Chain 18.
Sl st in every st all the way back. Sl st onto the bow.
Finish off and have a long tail to sew on the other end to the bow, while you have it wrapped around Little My’s neck. See picture. Fasten threads.


To make the buttons at the back of Little My’s dress you can make french knots.

And voila, your own Little My is finished! I hope you enjoyed the pattern. Please let me know if you see any mistakes, or if anything is unclear.
If you make this amigurumi I would love to see! If you share it on Istagram you can tag me @katrineklarer, or tag with #katrineklarer. 🙂
Have you seen my Bunny pattern?
The Moomins are after a pattern by Fuzzpoppi. I don’t think the pattern is still avaliable.

Little My is Tove Jansson’s character. This is just my interpretation of her.
I am also on Ravelry! If you make your own Little My you can share your creation on Ravelry, click the button below. 🙂

Oppdag mer fra Katrine Klarer
Abonner for å få de siste innleggene sendt til din e-post.

En kommentar om “Little My from Moomin – free pattern”