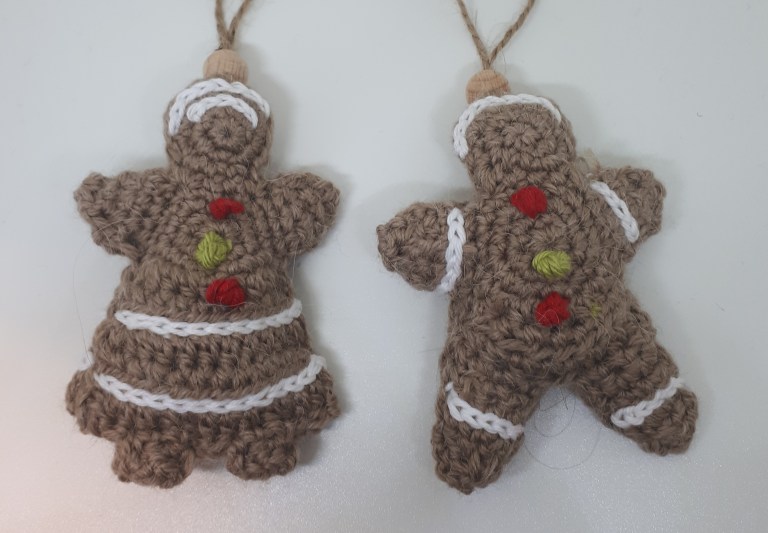
Gingerbread man and woman

So the other day I was just sitting around making some christmas decorations, and while I was searching trusty Pinterest for more patterns, I couldn’t really find a gingerbread woman I liked. So… then I had to make my own. And at the same go I figured I might as well make a matching man.
I wrote down how I made them, so heres a little free pattern for you.
Happy holidays! ❤
Stitches – US terms:
Magic ring
ch – chain
sc – single crochet
hdc – half double crochet
sl st – slip stitch
dec – decrease
inc – increase – 2 sc in one stitch
What you’ll need:
Yarn: some fingering weight yarn in brown, and some leftover yarn in white, red and green
Hook: 2 mm
a little stuffing
some twine and a bead
Finished size: 9 cm

Body:
1: 6 sc in magic ring = 6
2: inc x 6 = 12
3: 1 sc, inc x 6 = 18
4: 9 sc, 2 hdc i the same stitch, 8 hdc, 1 ch – turn = 19
5: 2 hdc i the same stitch, 9 hdc, 1 ch – turn = 11
6: 2 hdc i the same stitch, 10 hdc, 1 ch – turn = 12
7: 2 hdc i the same stitch, 11 hdc, 1 ch – turn = 13
8: 2 hdc i the same stitch, 12 hdc, 1 ch – turn = 14
Do not cut the yarn but continue with the leg –>


Legs:
Continue along the edge and make 3 sl st. –>
First leg:
1-2: 3 sc, 1 ch, turn = 3
3: dec over the 3 stitches (see the middle picture for reference) = 1
crochet 2 sl sts down along the side of the leg, and make 2 sl sts along the edge of the dress (look at the picture underneath for reference)

Second leg:
1-2: 3 sc, 1 ch, turn = 3
3: dec over the 3 stitches (see the middle picture for reference) = 1
crochet 2 sl sts down along the side of the leg, and make 3 sl sts along the remaining edge of the dress.

Finish off and fasten the thread. If you want to make a doublesided gingerbread you can save a long thread after you make the second piece to use later whn sewing them together.
If you feel like it’s difficult to make the sl sts all the time, you can also just start with a new thread for each leg. I wanted to have as few new starts as possible so that I didn’t have that many threads to fasten.

Head:
1: 6 sc in magic ring = 6
2: inc x 6 = 12
3: 1 sc, inc x 6 = 18


Do not cut the thread. Crochet the headpiece to the bodypiece by crocething through both layers. Make sure the pieces are right sides together when doing this. Crochet them together with 5 sc. See pictures and a poor quality video to see how I did it. 🙂
Do not cut the yarn but continue to crochet down the side to make the first arm. (see picture 1 for reference)


Arms:
1-3: 4 sc, 1 sc, turn = 4
4: 2 x dec, 1 ch, turn = 2
5: dec = 1
Finish off and fasten the thread.
Make another arm in the same manner at the opposite side. See picture for reference on where to start.
And if you want to make a gingerbread man, you only need to make the body and legs a bit different, the rest you do as with the woman:

Body – man:
1: 6 sc i magic ring = 6
2: inc x 6 = 12
3: 1 sc, inc x 6 = 18
4: 9 sc, 9 hdc, 1 ch, turn = 18
5-6: 9 hdc, 1 ch, turn = 9
continue with legs –>
First leg:
7-10: 4 sc, 1 ch, turn = 4
11: dec x 2, 1 ch, turn = 2
12: dec = 1
Finish off and fasten the thread.


Second leg:
Start with a new thread at the other side.
1-4: 4 sc, 1 ch, turn = 4
5: dec x 2, 1 ch, turn = 2
6: dec = 1
Finish off and fasten the thread.

Decorations:
For decorations you cn of course do as you want, but this is how I did it. I made a few lines with surface crochet on the skirt and head to imitate the icing on the gingerbread. And then I made a few buttons with red and green yarn by making french knots.


I made them doublesided. But if you want to just make one piece you can. Maybe to glue on to a card? Or just to hang as is. But do note that the the colorful thread will be visible at the backside.
On the gingerbread man I used the same techniques and made some icing on the arms and legs, one line at the head, and some buttons. The backside I kept bare.

Finish them off by threading some twine to the top of the head, and thread a wooden bead over the two ends, and a knot at the top. Now it’s ready to hang on the tree! 🙂
Thank you so much for checking out my pattern! If you make one of these I would love to see. You can share it as a project on Ravelry (click the button below), or at Instagram using the tag #katrineklarer or tag me @katrineklarer. 🙂

You may sell items made with this pattern (private sale, not coorporate), but do reference me if you put it up for sale in etsy or instagram and so on.
You can not republish the text and/or photos on your own blog etc, without referencing me, or asking me first. But you may share it as much as you like, as long as you link back here to me or my instagram.
– Katrineklarer
Oppdag mer fra Katrine Klarer
Abonner for å få de siste innleggene sendt til din e-post.
