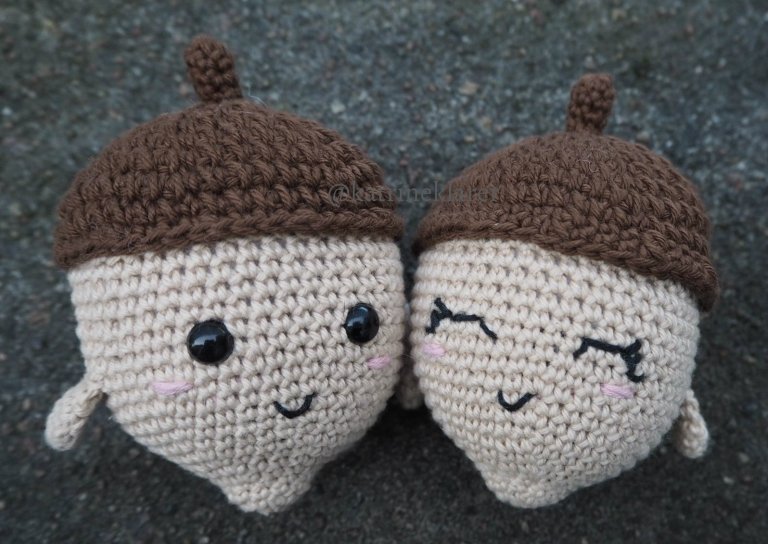
Acorn buddy

Fall is one of my favorite seasons, and Im really in the fall mood lately. So I wanted to make something that fits the season and so this pattern came to life. I wanted to make a cute little acorn. 🙂
I spent a little while online trying to figure out how to make my acorn, especially the top part as the nut has a special surface. I didn’t want to make it with a bobble or popcorn texture, but then I found this stitch called the Quick Bubble. And it was perfect. Just a little texture to make it come alive. I’ve linked the page where I learned the stitch myself further down, and I recommend you check out her site. 🙂
I hope you like the pattern and your new little fall friend!
Copyright:
This is a pattern made by me, Katrine Hansen Tveito. You may sell finished products made by this pattern. If you do this I would like to be credited as the maker of the pattern either by my name, or my accounts on either Etsy, Ravelry or Instagram. Please do not translate without asking or share this pattern on a different site. If you want to share the pattern use the option to link back to my page instead.
What you need:
Cotton or acrylic yarn. I used Järbo Nova, in the colors dark brown 48004, and light brown 48003. You could also use Drops Safran, or similar yarn. If you use a thicker/thinner yarn you need to adjust your hook size accordingly.
You could also use green instead for light brown.
Some leftover thread/embroidery floss in pink and black for embroidering on face details.
2 mm crochet hook, (or 2,25 mm/B) or the hook size that works for your tension and yarn. Make sure your stitches are tight. I always use a hook size smaller than what is recommended for the yarn.
Stuffing.
Safety eyes size 10 mm ca (or what you feel fits).
Scissors, pins and sewing needle.
Abbreviations – US terms:
Magic ring
sc – single crochet
inc – increase– 2 sc in the same stitch
qb – quick bubble – explantion underneath
qbsc inc – a quick bubble and single crochet in the same stitch
(1 sc, ubc) x 6 – this means you repeat the stitches inside of the (…) 6 times
Quick bubble: I learned the stitch from this site, and she has a very good explanation of the stitch. She has a step by step picture tutorial, written explanation and a video. I recommend you check out her explanation as she explains better than me in english.
The acorn is made by making a top and bottom seperatly and sewing them together. The you add a stem, and arms if you want to. You can either make it’s face with safety eyes or embroider details on. You can also make it without the face at all.
The acorn is made by crocheting in the round without joining. I advise using a stitch marker to keep track of where your round starts and ends.
I recommend you make the quick bubble stitches quite firm as they are a bit more loose than the sc’s.

Top:

In dark brown
1: 6 sc in magic ring = 6
2: (qbsc inc) in every st = 12
3: (1 qb, qbsc inc) x 6 = 18
4: (2 qb, qbsc inc) x 6 = 24
5: (3 qb, qbsc inc) x 6 = 30
6: (4 qb, qbsc inc) x 6 = 36
7: (5 qb, qbsc inc) x 6 = 42
8: (6 qb, qbsc inc) x 6 = 48
9: (7 qb, 1 sc) x 6 = 48
10: (1 qb, 3 sc, 1 qb, 3 sc) x 6 – crochet in front loop only = 48


By crocheting in the front loops only you will get these loops on the back side of your work. These are the loops you will use to sew the bottom part to in assembly.
(11: (1 qb, 3 sc, 1 qb, 3 sc) x 6 = 48)
If you want the top to go a bit further down «it’s face» you can make round 11 too. (This round is crocheted through both loops as normal) I have done this on the acorn with the embroidered face.
Finish off and fasten the thread. Make sure to not sew in the loops.
Stem:

In dark brown
1: 6 sc in magic ring = 6
2-4: 1 sc in every st = 6 (3 rounds)
Finish off and save a long tail for assembly. If you want the stem to be longer or shorter you can just add more rounds or stop earlier. All nuts are different.
Sew it on to the top part, in the first round. (In the middle). You can either sew it on now, or after you have sewn the top part to the bottom part.
Bottom:

In light brown
1: 6 sc in magic ring = 6
2: inc x 6 = 12
3-4: 1 sc in every st = 12 (2 rounds)

5: (1 sc, inc) x 6 = 18
6: (2 sc, inc) x 6 = 24
7: (3 sc, inc) x 6 = 30
8: (4 sc, inc) x 6 = 36
9: 1 sc in every st = 36
10: (5 sc, inc) x 6 = 42
11: 1 sc in every st = 42
12: (6 sc, inc) x 6 = 48
13-20: 1 sc in every st = 48 (8 rounds)
Finish off and save an extra long tail for assembly.
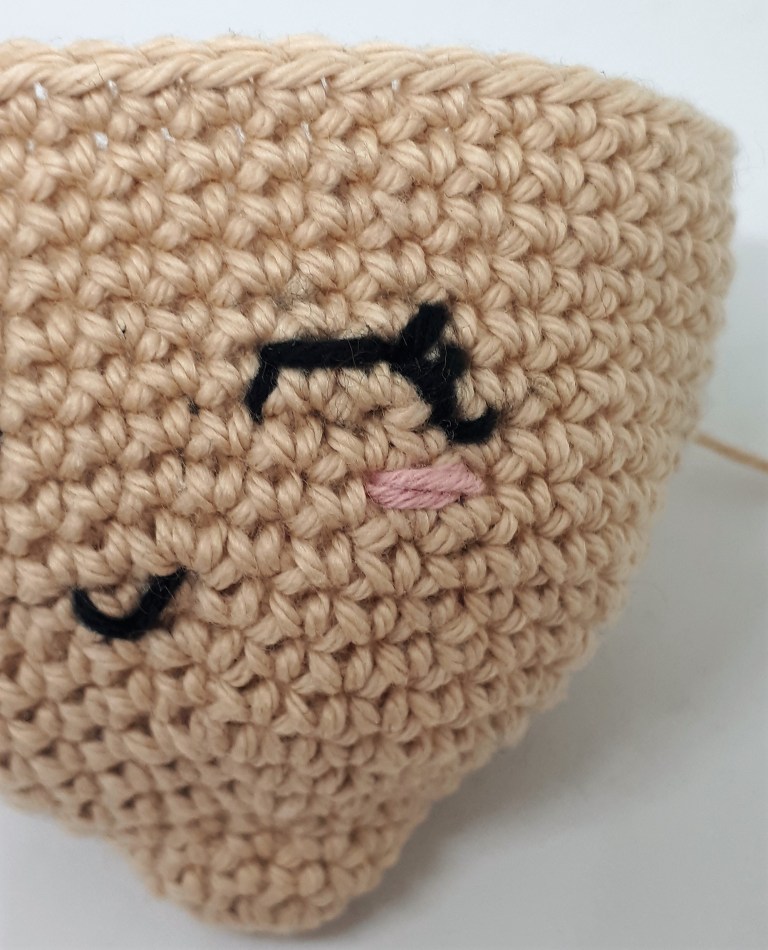
Fasten the safety eyes in between round 15 and 16 with 7 stitches apart and embroider on a little mouth with black thread and some blush with pink thread if you want to. I embroidered the blush on by making 3 horizontal stitches that are about 3 stitches broad, at about 1 round below the eyes. The mouth I embroidered on by making two slanted stithces that are about 1 stitch long, 4-5 rounds below the eyes.

If you want to embroider on the eyes instead you can of course do that. I embroidered them by making a small stitch from just below round 15 and slanted upwards to in between round 15 and 16. Then I made a horizontal stitch outwards at about 3 stitches length, and finished off by making a small slanted stitch down to below round 15. I also made some eye lashed by making 3 small stitches out from that last slanted stitch. Look at the picture below for reference.
Stuff the bottom part. Make sure to stuff the little tip at the bottom first, before you stuff the rest.

Sew the bottom to the top part by sewing one stitch from the bottom to one loop from round 10 in the top part. Before you get all the way around you stop for a bit and stuff the rest of the nut before closing it up.


Arms – make 2:

In light brown
1: 6 sc in magic ring = 6
2: (1 sc, inc) x 3 = 9
3-4: 1 sc in every st = 9 (2 rounds)
5: fold the arm so that the opening closes and make sc’s through one stitch on each side to close the hole – 4 sc
Don’t skip this step and sew it closed instead, as this makes the arm a bit longer.
Finish off and save a long tail for assembly. Sew them on to the bottom part, at the middle of each side, in round 14.


And now your little acorn buddy is finished! I would love to see your acorn, so if you’re on Instgram please share a picture and tag it with #katrineklarer or @katrineklarer so that I can see. 🙂 If you use Ravelry you can also add it as a project.

If you have any questions, found a mistake or want to show me a picture you can reach me at katrineklarer@outlook.com
Oppdag mer fra Katrine Klarer
Abonner for å få de siste innleggene sendt til din e-post.

Adorable!!!!
LikerLiker
Thank you! 🙂
LikerLiker
Bom dia tenho um filho autista que ama a noz da era do gelo e gostaria de fazer uma pra ele, vc sabe me dizer que tamanho fica esse bolota ? Desde já agradeço
LikerLiker
Hi, I tried to Google translate your comment as I only know norwegian and english. And if I understand correctly you’re asking about the size? With this yarn and hook mine turned out about 10-15 cm high. If you use different yarn/hook the size will wary. But its a small piece. 🙂
LikerLiker