Sponsored. The yarn I’ve used in this pattern has been sponsored by Hobbii.no. The idea to make a pattern is mine, and all opinions is mine.
I’ve been sponsored some nice cotton yarn from a norwegian yarn store. I get this opportunity since there are so many of you guys that want to follow me here on my blog and Instagram, and therefore I figured it’d be a nice thank you to give you a free pattern made from this yarn. 🙂 ❤ I hope you like Bailey the puppy!
Copyright:
This is a pattern made by me, Katrine Hansen Tveito. You may sell finished products made by this pattern. If you do this I would like to be credited as the maker of the pattern either by my name, or my accounts on either Etsy, Ravelry or Instagram. Please do not translate without asking or share this pattern on a different site. If you want to share the pattern use the option to link back to my page instead.
Yarn: Hobbii Rainbow Cotton 8/8 – Cotton yarn in worsted weight. 75 meters per 50 g.
Puppy:
Crochet hook: 2,5 mm (this depends on your crochet style, but make sure the stitches are tight. The yarn recommends 3,5-4 mm, but I found 2,5 mm best.)
Color 004 – beige – 1-2 skeins.
Color 006 – lys brun (brown)
Color 009 – svart (black) – just a little
Color 001 – hvit (white) – just a little
Color 023 – støvet grønn (green) – just a little
Bandana:
Crochet hook: 3,5 mm
Color 055 – solgul (yellow)
Supplies:
Stuffing, scissors, pins, needle, stitch marker and row counter.
Stitches used – US terminology:
Magic ring
ch – chain
sl st – slip stitch
sc – single crochet (UK: double crochet)
inc – increase by making 2 sc in one stitch
dec – decrease by crocheting 2 sc together – use invisible decrease if you know it
hdc – half double crochet (UK: Half treble crochet)
dc – double crochet (UK: treble)
(1 sc, inc) x 6 = means that you repeat the stitches in the parenthesis 6 times
A tip on how to make nice color changes:
When you’re doing a color change you start your sc, but you do not finish it. Instead you pick up your new color and pull that through the two loops on your hook in the last step. This makes nice color changes and are especially important for the eyes.
Pattern:
The puppy is crocheted in the round. Use a stitch marker to mark the beginning of your round. You can click the pictures to make them bigger if you need.
You start by making the head and body, which is crocheted in one piece.
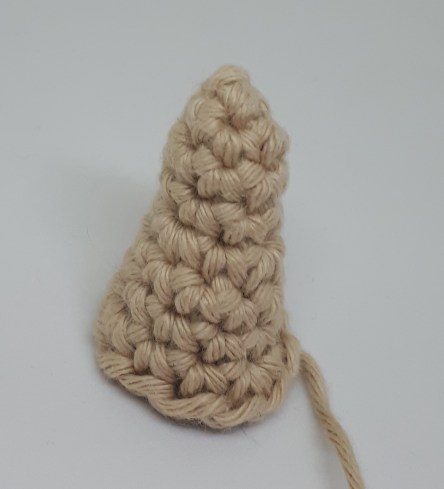
Head/body:
Start with beige
1: 6 sc in magic ring = 6
2: inc x 6 = 12
3: (1 sc, inc) x 6 = 18
4: (2 sc, inc) x 6 = 24
5: (3 sc, inc) x 6 = 30
6: (4 sc, inc) x 6 = 36
7: (5 sc, inc) x 6 = 42
8-12: 1 sc in every stitch = 42 (5 rounds)
13: (6 sc, inc) x 6 = 48
14-16: 1 sc in every stitch = 48 (3 rounds)
17: (2 sc, dec) x 12 = 36
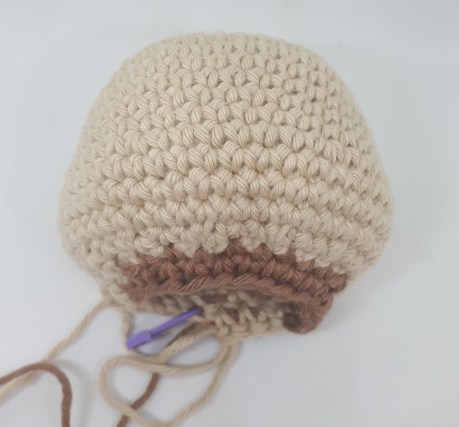
Now there’s a few color changes. You can either cut and fasten the thread each time, or you can crochet with the other color at the same time. To do that you hold the strand of the color you’re not working with close to your work on the back/inside and crochet around it with the other color. Pull a little on the thread so that is isn’t too loose. Google tapestry crochet for a more in depth tutorial.
18: (1 sc, dec) x 3, switch to brown: (1 sc, dec) x 5, switch to beige: (1 sc, dec) x 4 = 24
19: 5 sc, switch to brown: 15 sc, switch to beige: 4 sc = 24
20: (3 sc, inc) x 2 , switch to brown: (3 sc, inc) x 3, 2 sc, switch to beige: 1 sc, inc = 30
Stuff the head and neck well. At this point you want to decide what is the front and back of your puppy. I wanted the brown patches on the back. Stuff the cheeks well.
21: 4 sc, inc, 4 sc, switch to brown,(now we’re not switching back to beige for a while, so you can just leave the thread of beige hanging) inc, (4 sc, inc) x 4 = 36
22: (5 sc, inc) x 6 = 42
23-24: 1 sc in every stitch = 42 (2 rounds)
25: (6 sc, inc) x 6 = 48
26: 13 sc, switch to beige: 10 sc, switch to brown: 15 sc, switch to beige: 10 sc = 48
27: 24 sc, switch to brown: 16 sc, switch to beige: 8 sc = 48
28: 26 sc, switch to brown: 13 sc, switch to beige: 9 sc = 48
29: 29 sc, switch to brown: 10 sc, switch to beige: 9 sc = 48
30: 32 sc, switch to brown: 5 sc (now we’re done with the color changes, and you can cut and fasten the brown thread on the inside) switch to beige: 11 sc = 48
31-35: 1 sc in every stitch = 48 (5 rounds)
36: (6 sc, dec) x 6 = 42
37: (5 sc, dec) x 6 = 36
38: (4 sc, dec) x 6 = 30
39: (3 sc, dec) x 6 = 24
40: (2 sc, dec) x 6 = 18
41: (1 sc, dec) x 6 = 12
42: dec x 6 = 6
Finish off and sew closed the remaining hole. Use a needle and thread the yarn tail through the last rounds front loops and pull tight so that the hole closes. Fasten the thread.


Snout:
In beige
1: 6 sc in magic ring = 6
2: inc x 6 = 12
3: (1 sc, inc) x 6 = 18
4: dec, 3 sc, inc, 1 sc, inc, 1sc, inc, 4 sc, dec x 2 = 18
5: 1 sc in every stitch = 18
6: (2 sc, inc) x 6 = 24
7: 1 sc in every stitch = 24
Finish off and save a long tail for assembly. The part with the decreased stitches in round 4 is up on the snout. Embroider on a nose and mouth with the black yarn. Start in the middle of the magic ring and make a few stitches up and outwards, about 2 rounds, and one down for about 2 rounds to make the mouth.


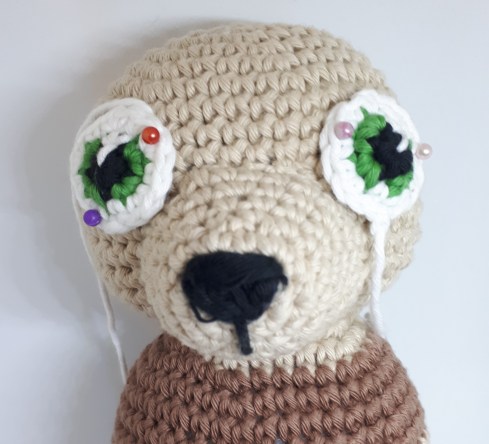
Sew it on between rounds 10-18, at the middle of the head. Begin sewing it on, but before you reach all the way around stop for a minute and stuff the snout.


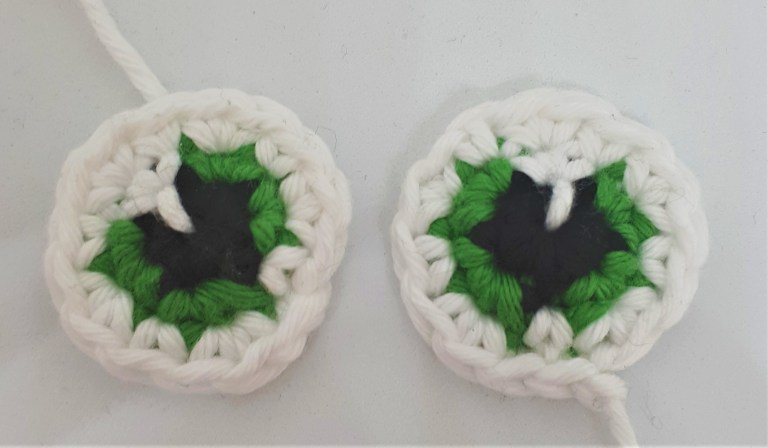
Eyes – make 2:
With black, white and green.
1: begin with black: 5 sc in magic ring = 5
2: switch to green: inc x 2, switch to white: inc x 1, switch to green: inc x 2 = 10
3: switch to white: (1 sc, inc) x 5 = 15
Finish off with 1 sl st to the first stitch of the round and save a long yarn tail for assembly. Embroider one a white stitch with the yarn tail from the middle of the magic ring to the middle of the 2 white stitches in round 2. This is the glimmer in the eye.
Fasten all threads.
Sew on the eyes close to the snout (sew on the snout first) between rounds ca 8-13. About 7 stitches apart. Pin them on first and find the placement you like. Make sure the glimmer in the eye, that white stitch, goes the same way for both eyes. On mine they go towards the right.
Ears – make 2:
In brown
1: 6 sc in magic ring = 6
2: 1 sc in every stitch = 6
3: (1 sc, inc) x 3 = 9
4: (2 sc, inc) x 3 = 12
5: (1 sc, inc) x 6 = 18
6-7: 1 sc in every stitch = 18 (2 rounds)
8: (2 sc, inc) x 6 = 24
9-10: 1 sc in every stitch = 24 (2 rounds)
11: (2 sc, dec) x 6 = 18
12-13: 1 sc in every stitch = 18 (2 rounds)
Finish off and save a long tail for assembly.


Sew the opening closed, but when you have sewn about halfway you skip a stitch, insert the needle into the next stitch, bend it so that it goes into that skipped stitch but, on the underside, go back up in that first stitch on the top and tighten the thread. Repeat one more time. See pictures below for reference. This makes the ear a little bent.


Sew them on in round 6-7, a little behind the eyes. Follow the curve of the round on the head to see how to sew them on.


Arms – make 2:
In brown
1: 6 sc in magic ring = 6
2: inc x 6 = 12
3: (1 sc, inc) x 6 = 18
4-5: 1 sc in every stitch = 18 (2 rounds)
6: 6 sc, dec x 6 = 12
7-14: 1 sc in every stitch = 12 (8 rounds)
Stuff the arm, not a lot in the upper part. Crochet the opening closed by making 6 sc through one stitch on each side. Sew picture below for reference.


Sew them on right below the neck ca. round 21-22, either straight on or a little bent so that they go towards the belly. I made mine a little bent by sewing one corner about 2-3 rounds below the other.


Legs – make 2:
One in beige and one in brown
1: 6 sc in magic ring = 6
2: inc x 6 = 12
3: (1 sc, inc) x 6 = 18
4: 12 sc, inc x 6 = 24
5-6: 1 sc in every stitch = 24 (2 rounds)
7: 12 sc, dec x 6 = 18
8: (1 sc, dec) x 6 = 12
Stuff the bottom part of the leg now while you can still reach it.
9-15: 1 sc in every stitch = 12 (7 rounds)
Finish off and save a long tail for assembly. Stuff the rest of the leg, but not too much so that he is able to sit down. The part with decreases in round 7 is the front part of the leg.


Sew them on at the bottom of the body. Sew them on right next to that very last round where you sewed the opening closed. See pictures below for reference.


Tail:
In beige
1: 3 sc in magic ring = 3
2: inc x 3 = 6
3-4: 1 sc in every stitch = 6 (2 rounds)
5: (1 sc, inc) x 3 = 9
6-7: 1 sc in every stitch = 9 (2 rounds)
8: (2 sc, inc) x 3 = 12
Finish off and save a long tail for assembly. Stuff it.
Sew it on at the back of the «butt» in round 33-36 ca.


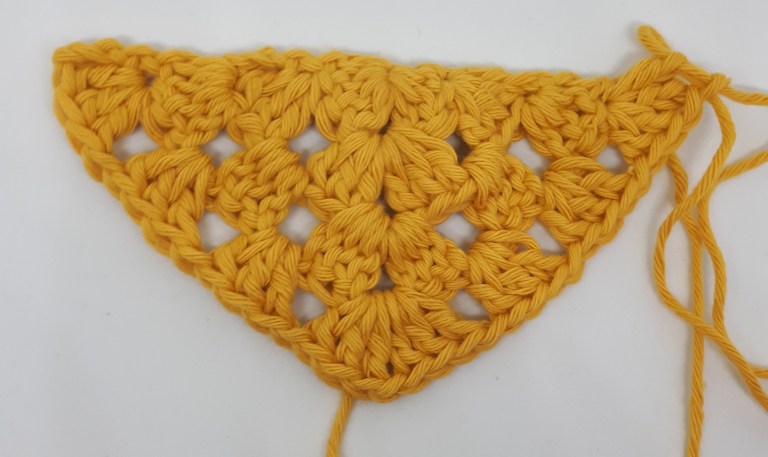
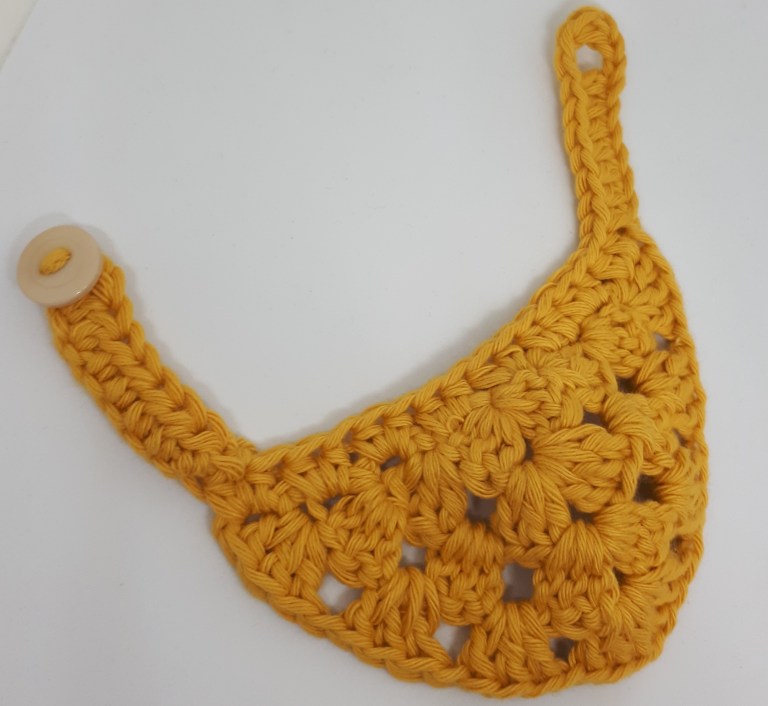
Bandana:
In yellow
Now we’re making a bandana bib for the dog in granny squares style. Use hook 3,5 mm now since we don’t need tight stitches anymore.
1: In magic ring: 3 ch, 3 dc, 1 ch, 4 dc
2: 3 ch, turn, 3 dc in the first stitch, 1 ch, (3 dc, 1 ch, 3 dc) i ch-space from last round, 1 ch, 4 dc in the last stitch.
3: 3 ch, turn, 3 dc in the first stitch, 1 ch, 3 dc i ch-space, 1 ch, (3 dc, 1 ch, 3 dc) i ch-space at the top, 1 ch, 3 dc in ch-space, 1 ch, 4 dc in the last stitch.
4: 3 ch, turn, 3 dc in the first stitch, 1 ch, 3 dc in ch-space, 1 ch, 3 dc in ch-space, (3 dc, 1 ch, 3 dc) in ch-space at the top, 1 ch, 3 dc in ch-space, 1 ch, 3 dc in ch-space, 1 ch, 4 dc in the last stitch.
5: Straps: chain 10, 1 hdc in the 2nd stitch from the hook, 1 ch, skip a stitch (this makes a button hole. If you don’t want to have a button hole and button, but rather just sew the ends together, then you can make 1 hdc here instead) 7 hdc, continue along the top of the bandana with 2 hdc around each dc/3 ch, make 9 ch, 1 hdc in the 2nd stitch from the hook, 7 hdc, finish with 1 sl st in the bandana.


Finish off and fasten the thread. Sew on a button that fits the hole, I used one that is about 15 mm in diameter and sew it on at the end of the strap.
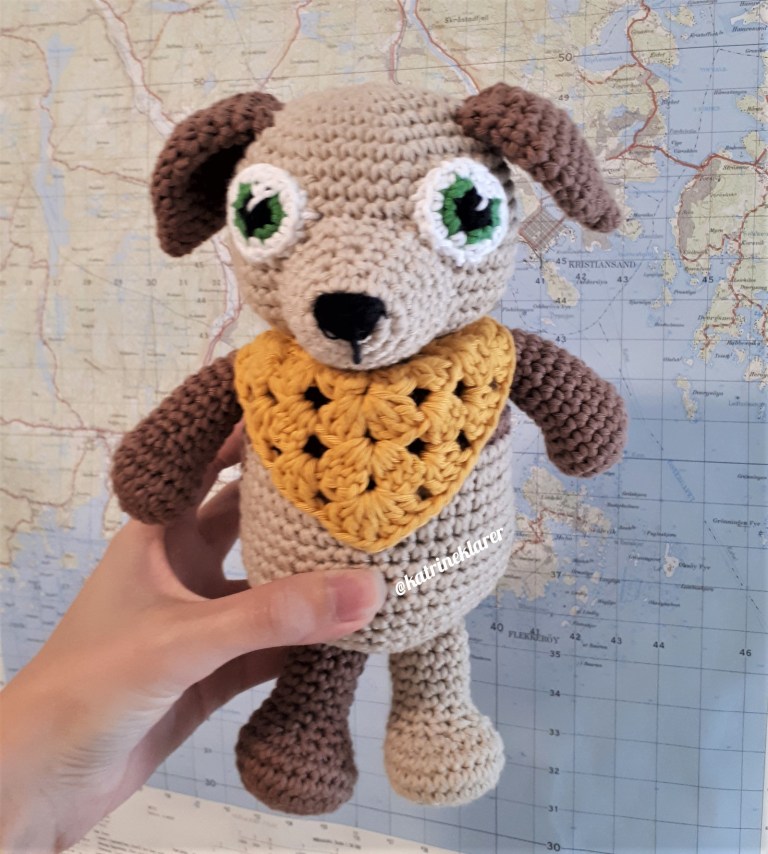
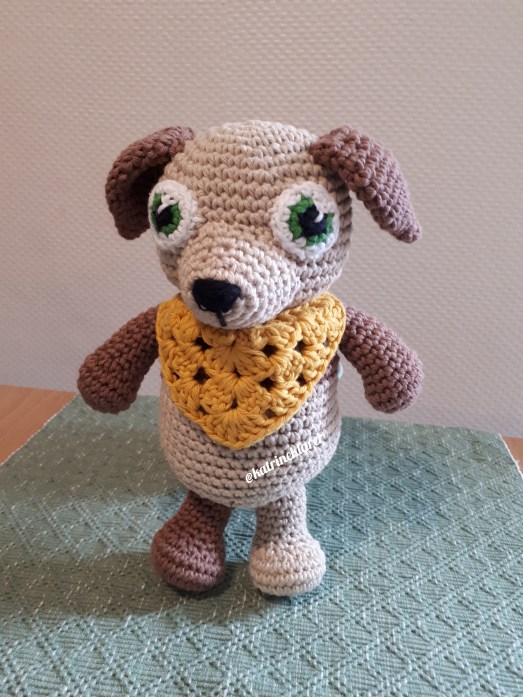
Hooray! Your little puppy Bailey is finished! I hope you are happy with the result. If you’ve found any typos or bad language I am sorry. I am norwegian and translate my pattern by myself. Please let me know if I can fix anything. If you have any questions or feedback you can reach me on Instagram at @katrineklarer or by email katrineklarer@outlook.com.
I would love to see your finished Bailey! Save it as a project on Ravelry, post a picture on Instagram with the tag #katrineklarer or tag me @katrineklarer. ❤

Oppdag mer fra Katrine Klarer
Abonner for å få de siste innleggene sendt til din e-post.

Love thiis
LikerLiker