Materials
Yarn: Soft Merino – Strikkeline – 22/10 – 3,5-4 mm. 215 m per 100 g.
Amount: 200 g in one or two colors (100 g in each color)
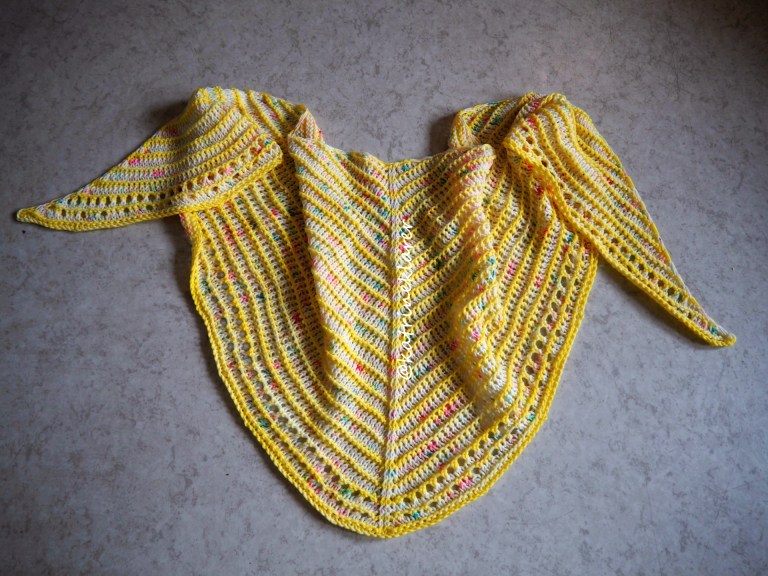
I used yarn that was Limited Edition; bright yellow for the garter knit parts, and hvit with speckles for the stocking stitch parts.
Needle size: 6 mm/US 10 – I used circular needles 120 cm
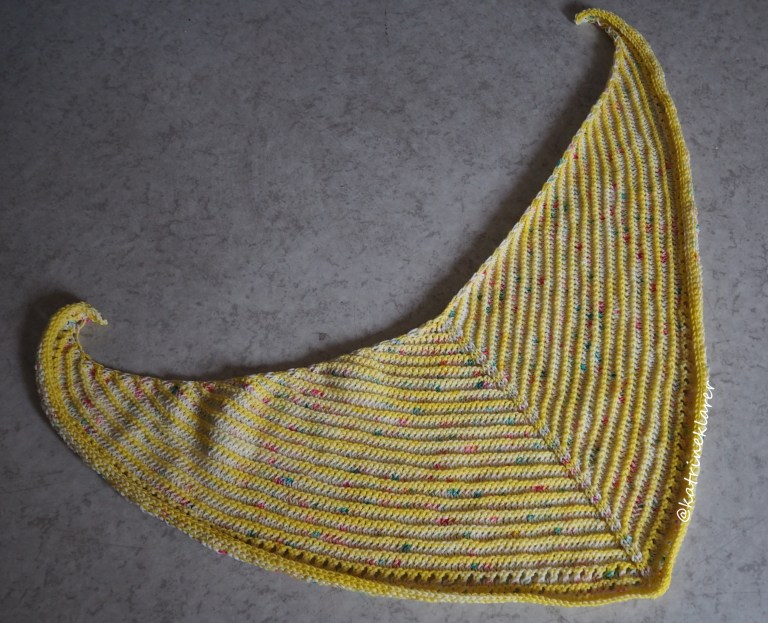
Size of the shawl (blocked): 48 cm wide (measured from the middle and down the middle stitches) and ca. 156 cm length wise, from one point to the other point.
About the pattern
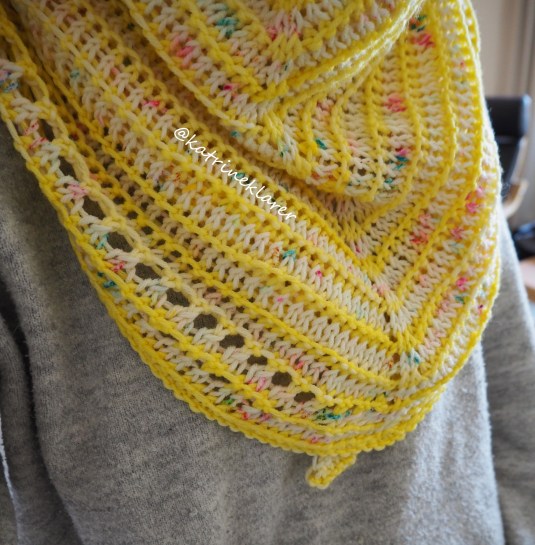
The shawl is being knitted back and forth by repeating 4 rounds that makes the pattern. You increase in each side on each round, and at the middle every other round. You alternate between the garter stitch and stockinette stitch. You mainly knit, but every 4th round you purl to obtain the stockinette stitch. For my shawl I chose to have the garter stitch rounds in one color and the stockinette stitch rounds in another color, so I also altnerate between yarn colors. Towards the end of the shawl there is two rounds of eyelet pattern. These you make by knitting with yarn forward and decreasing with knitting 2 stitches together.
This pattern has not been tested by anyone other than me, or in any other yarn. This is also my first translation of a knit pattern to English. I mainly translate crochet patterns. If you do try this pattern I would love some feed back. 🙂 Is it ok to understand? Do I use wrong terminology? What yarn did you use? You can contact me on katrineklarer@outlook.com or write a comment.
Copyright
This is a pattern made by me, Katrine Hansen Tveito. You may sell finished products made by this pattern. If you do this I would like to be credited as the maker of the pattern either by my name, or my accounts on either Etsy, Ravelry or Instagram. Please do not translate without asking or share this pattern on a different site. If you want to share the pattern use the option to link back to my page instead.
Abbreviations
k – knit
p – purl
knit into the back of the stitch – knit by inserting your needle into the back of the stitch. Video on how to do it here.
inc2k – increase by knitting 2 sts into 1 stitch – knit into the front and back of the stitch
inc-r – insert your needle under the thread between the stitches from the front with you left needle, twist your needle to the right so that it forms a loop, and knit it
inc-l – insert your needle under the thread between the stitches from the back with you left needle, twist your needle to the left so that it forms a loop, and knit it
Pickles has a nice video on it here. It’s in Norwegian but you can at least see how it’s done.
inc-p – inc by purling – increase by inserting your left needle under the thread between the stitches and knit this purl wise into the back of the stitch. Video on to purl into the back of the stitch here.
yarn forward– yarn over your needle, don’t knit it. You purl it on the next round.
k2tog– knit 2 sts together
Every round except the first one starts by knitting the first stitch in to the back of the stitch, and each round ends with holding the thread in front of your work and then moving the last stitch onto your right needle without knitting it. This makes a lovely edging that I learnt from a pattern called Eliesjalet by Ann Silje Rolnes. 🙂

Pattern – start
Cast on 6 sts in your main color (the color that you will use in the garter stitch)
1: k1, inc2k, place a stitch marker, k2, place a stitch marker, inc2k, hold the thread in front of your work and move the last stitch onto your right needle without knitting it.
2: k1 into the back of the stitch, inc2k, knit until your stitch marker, p2, knit until you have 2 sts left, inc2k, hold the thread in front of your work and move the last stitch onto your right needle without knitting it.
Repeating pattern (round 3-6 is repeated to make the pattern)
Switch to your detail color (stockinette stitch)
3: k1 into the back of the stitch, inc2k, knit until your stitch marker, inc-r, k2, inc-l, knit until you have 2 sts left, inc2k, hold the thread in front of your work and move the last stitch onto your right needle without knitting it.
4: k1 into the back of the stitch, inc-p, purl until your last stitch is left, inc-p, hold the thread in front of your work and move the last stitch onto your right needle without knitting it.
Switch to main color (garter stitch)
5: k1 into the back of the stitch, inc2k, knit until your stitch marker, inc-r, k2, inc-l, knit until you have 2 sts left, inc2k, hold the thread in front of your work and move the last stitch onto your right needle without knitting it.
6: k1 into the back of the stitch, inc2k, knit until your stitch marker, p2, knit until you have 2 sts left and inc2k, hold the thread in front of your work and move the last stitch onto your right needle without knitting it.
Repeat rounds 3-6. This means you increase at the start and end of each round by knitting 2 sts in one stitch, and you increase at the middle every other round. The 2 sts between your stitch markers remain the same, k on the right side, purl on the back side.
Repeat until you get 20 garter rounds. Now you can begin on the eyelet patterns.
Eyelet rounds
Eyelet rounds 1 in detail color
1: k1 into the back of the stitch, inc2k, *1 yarn forward, k2tog* repeat the stitches in *…* until the stitch marker, inc-r, k2, inc-l, *k2tog, 1 yarn forward* repeat the stitches in *…* until you got 2 sts left, inc2k, hold the thread in front of your work and move the last stitch onto your right needle without knitting it.
2: k1 into the back of the stitch, inc-p, purl until the last stitch, inc-p, hold the thread in front of your work and move the last stitch onto your right needle without knitting it.
Repeat round 5 and 6 from the repeating pattern in main color (garter stitch).
Eyelet rounds 2 in detail color
1: k1 into the back of the stitch, inc2k, *1 yarn forward, k2, k2tog* repeat the stitches in *…* until 2 sts before the stitch marker, 1 yarn forward, k2tog, inc-r, k2, inc-l, k2tog, 1 yarn forward, *k2tog, k2, 1 yarn forward* repeat the stitches in*…* until there are 2 sts left, inc2k, hold the thread in front of your work and move the last stitch onto your right needle without knitting it.
2: k1 into the back of the stitch, inc-p, purl until the last stitch, inc-p, hold the thread in front of your work and move the last stitch onto your right needle without knitting it.
Repeat round 5 and 6 from the repeating pattern in main color (garter stitch).
If you want to try making these eyelet rounds earlier or later in the pattern you may of course try. I have not tested this but in theory it might work as you will always have even numbers.
Finishing off
Continue in garter stitch in the same color (or the other color if you’d like).
1: k1 into the back of the stitch, inc2k, knit until your stitch marker, remove your stitch marker, k2, remove your stitch marker, knit until you have 2 sts left, inc2k, hold the thread in front of your work and move the last stitch onto your right needle without knitting it.
Cast off. I cast off by knitting 2 sts together in the back of the stitch. You can choose the way you like to cast off, but do it in knit, not purl. You want to get that last garter stitch row.
Now you can choose wheter or not to block it. I wet my shawl and gently pressed the water out. Then I layed it on top of a towel on to my yoga mat and pinned the edges down. I wanted to make sure the edge was flat. This made the shawl bigger and looser. My shawl got bigger and looser just by wetting it, so if you don’t want that to happen you might want to skip this step. I’ve only tried in this yarn, so your yarn choce might act differently.
I am not expert on this so if you know any better, you do you! 🙂

Thank you for stopping by my blog and checking out my pattern. Please do contact me if you have any questions or feed back at katrineklarer@outlook.com. I am sorry if this pattern is hard to read, I have never translated knit pattern before as stated. So please bear with me. 🙂
Made the shawl? Share it as a project on Ravelry so that I can see! 🙂 
Or if you post on Instagram tag me with @katrineklarer or #katrineklarer, or #lemonteatimeshawl 🙂
Oppdag mer fra Katrine Klarer
Abonner for å få de siste innleggene sendt til din e-post.

En kommentar om “Lemon Tea Time Shawl”