Bunny-lovey

UPDATE JULY 2018:
Hi guys! I’ve added some new pictures and changed some of the text in the pattern, as I have more experience and better photo equipment now. The pattern is still the same, but hopefully a little improved. Thank you all so much for your love on this pattern.
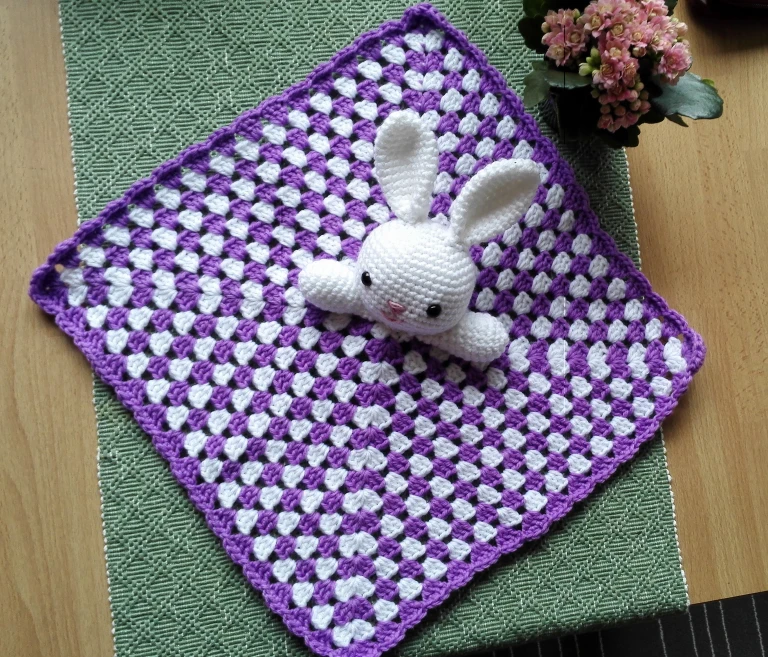
Here is a pattern on a cute bunny-lovey I made! I just love loveys, the kids get both a blanket and a little friend to snuggle with. 🙂
So I used a yarn that you only get in Norway, but it is a yarn that consists of 70% polyester and 30% acrylic. Its very soft and nice, but you can find a yarn that you like the consistency of. The yarn recommends using a hook sized 3,5-4 mmE/F/9/8, but if you use different yarn you just adjust after what the label says. I recommend using a hook one size smaller than what the yarn recommends for the bunny’s head and arms, but you can use the recommend hook or bigger for the actual blanet. This is because it’s important to crochet tightly when making stuffed animals so that the filling doesn’t show through.
PS. if you want to make a different blanket than the traditional granny squared one, there are many tutorials out there. Recently «The Crafty Mama Bear» made a 6 point star blanket lovey, while using my bunny head and arms for the top. You can find her pattern for that blanket here.
What you’ll need:
Yarn: White for the bunny and blanket, about 100-150m/109-164yards. And some purple(or another color) for the blanket, about 100m/109yards. Worsted weight.
Hook: 3,5mm/E/9 for the bunny, and 4mm/F/8 for the blanket.
Filling/stuffing.
Safety eyes. 10 mm – or embroider some eyes on.
Some embroidery thread or cotton yarn to sew on a nose and mouth, in pink.
Abbreviations – US terms:
Magic ring: If you dont know how to do a magic ring, you can also chain 4 and sl st it together and make the stitches inside of the ring. But this is a magic ring.
Invdec: invdec stands for invisible decrease, and is a decrease that just looks nicer. You can also use just normal decrease, where you crochet 2 stitches together, but I like this one better. This is how you do it.
Inc: Inc stands for increase, and means that you make 2 stitches in the same stitch.
sc – single crochet
dc – double crochet
hdc – half double crochet
(…) x 6 = repeat the stitches in the (…) 6 times.
You start with the bunny, and you crochet «in the round», so you don’t join each round, but just continue on like a spiral. You can either place a stitch marker on the beginning of the round or just count to keep track.
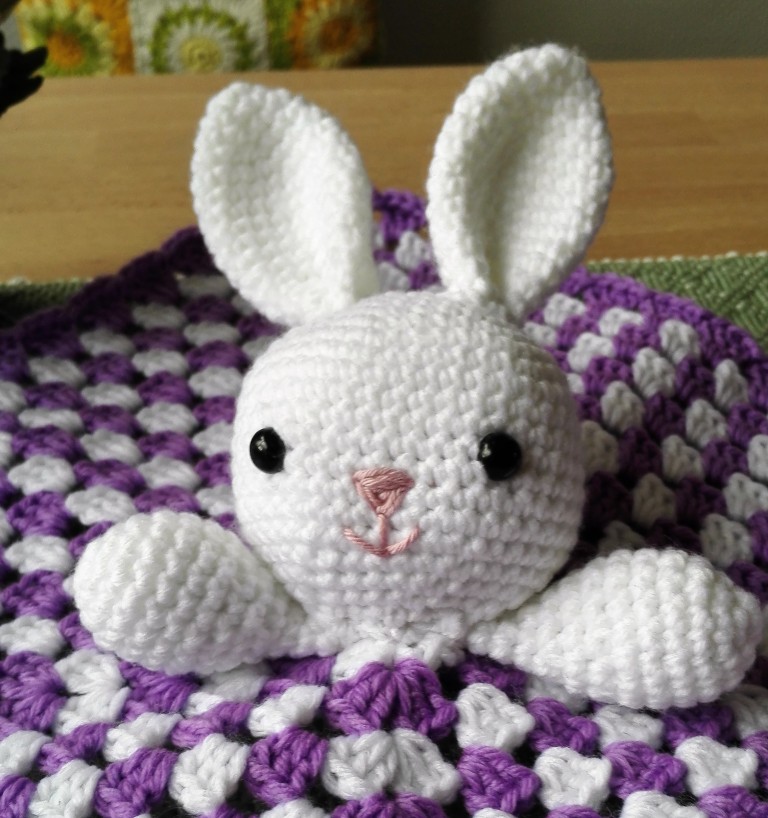
I sewed on the ears, nose and mouth, and fastened the safety eyes before the bunny head is finished, but you can also sew on the ears after the head is done. Whatever you prefer.
You can now begin with the ears:
Ears – make 2:

1: Magic ring with 6 sc in it = 6
2: (1 sc, inc) x 3 = 9
3: (2 sc, inc) x 3 = 12
4: (3 sc, inc) x 3 = 15
5: (4 sc, inc) x 3 = 18
6-10: 1 sc in every st = 18 (5 rounds)
11: (4 sc, invdec) x 3 = 15
12-15: 1 sc in every st = 15 (4 rounds)
Finish off and leave a long tail to sew the ears on with. Fold the ear in two, and sew a few stitches at the bottom to make it a little bent, see pictures below for reference. (click the pictures to get them bigger). I sew a few stitches up, but you can also skip this step if you want to have them more loose. Sew them on to the head between round 3 and 4.


Head:


1: 6 sc in magic ring = 6
2: inc x 6 = 12
3: (1 sc, inc) x 6 = 18
4: (2 sc, inc) x 6 = 24
5: (3 sc, inc) x 6 = 30
6: (4 sc, inc) x 6 = 36
7: (5 sc, inc) x 6 = 42
8 – 16: 1 sc in every st = 42 (9 rounds)
17: (5 sc, invdec) x 6 = 36
18: (4 sc, invdec) x 6 = 30
Now you can place the eyes between row 12-13, with 8 stitches between them. Embroider on a nose and mouth, and sew on the ears now if you want.


19: (3 sc, invdec) x 6= 24
20: (2 sc, invdec) x 6= 18
Fill the head with stuffing now. Fill some more later if needed.
21: (1 sc, invdec) = 12
22: invdec x 6 = 6
Finish off and sew closed the remaining hole. Make sure to have a long enough tail to sew the head on to the blanket later.
Arms – make 2:


1: Magic ring with 6 sc = 6
2: inc x 6 = 12
3: (1 sc, inc) x 6 = 18
4-7: 1 sc in every st = 18 (4 rounds)
8: (1 sc, invdec) x 6 = 12
9: 1 sc in every st = 12 – fill with stuffing
10: (1 sc, invdec) x 4 = 8
11-13: 1 sc in every st = 8 (3 rounds)
Finish off and leave a long tail to sew on the arms with. You do not need to fill the arms with any more stuffing after row 9, because the smaller ends of the arms should be quite flat, so that they lay neatly under the head.


Blanket:
Now you can make the blanket. This is made as a big granny square, but you can also change it up and make a different design. I made a granny square with 16 rounds. You can make as many rounds as you like, depending on what size you want. There are many tutorials on this online if you don’t know how to do it. Im not that good at english, so you might want to find a another tutorial. But here is mine:
You start with a magic ring, and make: chain 3, 2 dc, chain 1, 3 dc, chain 1, 3 dc, chain 1, 3 dc, chain 1 and join. This makes 4 corners, with 4 groups of 3 dc (the chain 3 equals 1 dc). Then you continue this, by making 3 dc and chain 1 every time, but in the corners you do 3 dc, chain 1, 3 dc in the same hole. Some make 2 ch between the dc-clusters, but I prefer only 1 ch.
Watch this slide show for the process:
After you’ve made 16 rounds of this, you can add an edge. Either make 1 hdc in every stitch to get a straight edge, or you can make a more wavey one that I have made:
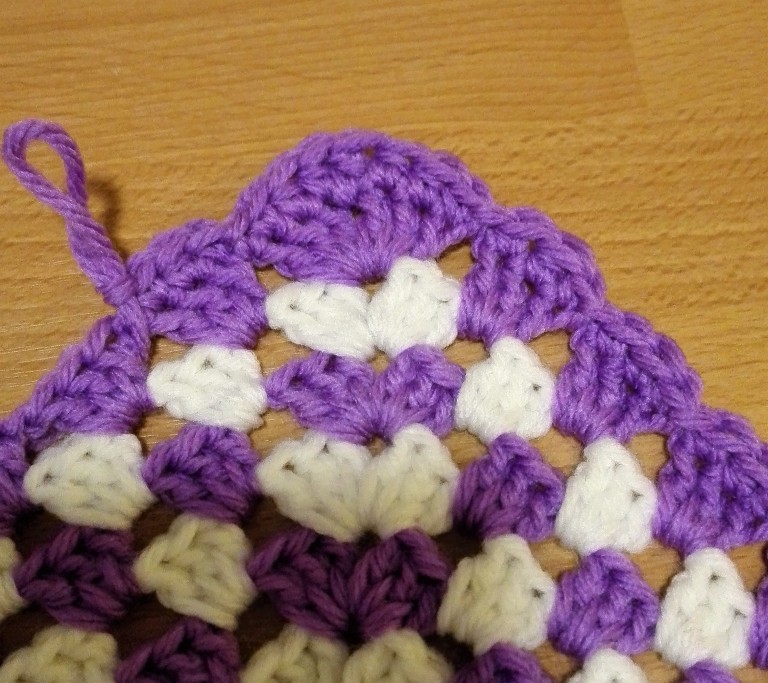
In every corner you make these stitches: 1 sc in the first dc, 1 hdc in the next 2 dc, 1 dc in the chain hole in the corner, and 1 hdc in the next 2 dc, and 1 sc in the last dc, and 1 sl st in the hole between the corner and the next 3 dc group.
Over the 3 dc + 1 chain pairings on the sides you do this in each one:
1 sc in the first, 1 hdc in the next, 1 sc in the 3rd dc, and sl st in to the chain space.
If you want a «bigger wave» you can make a hdc instead of a sc, and dc instead of a hdc and so on.
Now you can sew the bunny head and arms onto the blanket! Sew it on in the middle, in the first round of the granny square. Sew it on tightly. If you want to fold it so it lays like in the top picture, you need to make sure the face is turned towards the point, but this is not important. It just looks nice, but the kid won’t care 😉
Now you have a bunny-lovey! 😀
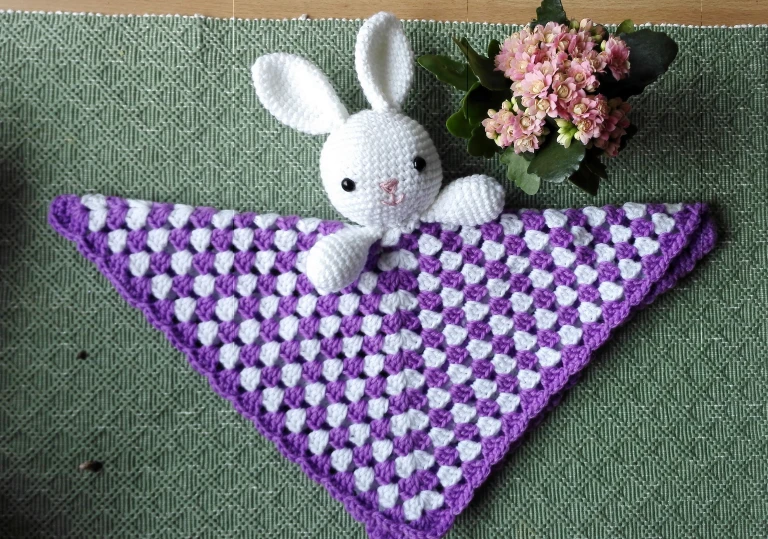

Lovey from July 2018 – made in cotton yarn.
Thank you for checking out my pattern. Please let me know if you see any mistakes, or have any problems.
If you want to share your creation with me please tag me at instagram with #katrineklarer 🙂
You may sell items made with this pattern (private sale, not coorporate), but do reference me if you put it up for sale in etsy or instagram and so on.
You can not republish the text and photos on your own blog etc, without referencing me, or asking me first. But you may share it as much as you like, as long as you link back here to me or my instagram.
I am also on Ravelry! You can add your finished lovey to a project if you want to 🙂 Click the button below to see other projects 🙂

Oppdag mer fra Katrine Klarer
Abonner for å få de siste innleggene sendt til din e-post.

CONGRATULATIONS FOR SUCH WONDERFUL PATTERN INSTRUCTIONS AND QUALITY OF FINISHED ITEM—MANYU THANMKS, FAY
LikerLiker
Congratulations for such wonderful instructions, they are so easy to understand and the quality of the finished item.
Many thanks, Fay
LikerLiker
Thank you so much! Glad to hear you liked it. 🙂
LikerLiker
I love this pattern and made it for a friend who is going to have a little girl any day now. I will share your website with online friends who are wanting to make it too. Thank you for this adorable pattern ❤ Hugzzzz
LikerLiker
Aw, thank you so much! I hope the little girl will like it. ❤
LikerLiker
Hello! Love this lovey so much! What are the measurements of your finished blanket??
LikerLiker